No closets is not a flaw, it is a layout challenge you can absolutely win. The goal here is simple: give everything a home, keep daily stuff within easy reach, and do it without wrecking your walls or your budget. I live with a very opinionated cat named Whiskers who treats open baskets like personal trampolines, so I learned the hard way that storage has to be secure, durable, and easy to reset. If you want quick wins you can do in a weekend, plus a plan that scales, you are in the right place.
TL;DR
- Map what you own into zones by room and frequency of use; match each zone to a wall, door, corner, or piece of furniture.
- Go vertical first: track wall studs, use over-door racks, ceiling hooks, and tall cabinets anchored for safety.
- Swap in furniture that hides storage (beds, sofas, benches, tables) before buying bins; the shell should hold the clutter.
- Use repeatable containers with labels, one size per zone; store heavy low, light high, 20% buffer space for growth.
- Renting? Choose tension, freestanding, adhesive, and reversible fixes; protect walls and floors and keep the receipts.
I am going to show you exactly add storage to a house with no closets with a clear plan, room-by-room plays, safe wall mounting, renter-friendly options, and simple systems that keep it tidy.
Make a plan that actually fits your stuff (and your walls)
Start with jobs to be done. After clicking this, you probably want to: 1) figure out where to put clothes, linens, and cleaning gear without closets, 2) use walls, doors, and ceilings safely, 3) add hidden storage with furniture swaps, 4) do it fast, cheap, and renter-friendly, and 5) keep it neat so it does not slide back to chaos.
Before you buy a single bin, measure and inventory. Skipping this step is why storage fails. A shelf that looks perfect online collapses under your winter boots if you guess on weight and width.
Do this once, and the rest gets easy:
- Inventory by use frequency. Make three short lists: daily (coats, shoes, bags), weekly (towels, cleaning tools), seasonal (luggage, bulky bedding). Daily items deserve prime, reachable spots. Seasonal can go high, deep, or out-of-sight.
- Measure the room envelope. Note ceiling height, clear wall widths, door backs, the space under beds/sofas, and awkward corners. Jot down baseboard height and any vents or outlets.
- Find studs and set an anchor strategy. Typical studs sit 16 inches on center in many homes. Use a stud finder and painter’s tape to mark a vertical line where you can mount shelves or tall furniture. For masonry, plan sleeve anchors. For drywall without studs, plan toggles and keep loads light. Safety first.
- Set a capacity target. A rule of thumb: 1 linear foot of 12 in deep shelving holds about 2.5 cubic feet. A 12x12x12 box is roughly 1 cubic foot. Count your bins, blankets, and boots, then ensure you are creating at least that much space, plus a 20% buffer.
- Choose a visual style. Do you want things hidden (doors, curtains, baskets with lids) or proudly displayed (open shelving, pegboards)? Match the style to your tolerance for visual clutter. I hide cat treats because Whiskers has opinions.
Room-by-room zone cheat sheet:
- Entry: wall-mounted coat rack into studs, shoe bench with lift-top, tray for keys, over-door catch-all rack.
- Living: media cabinet with doors, storage ottoman, floating shelves for books, lidded baskets for remotes and chargers.
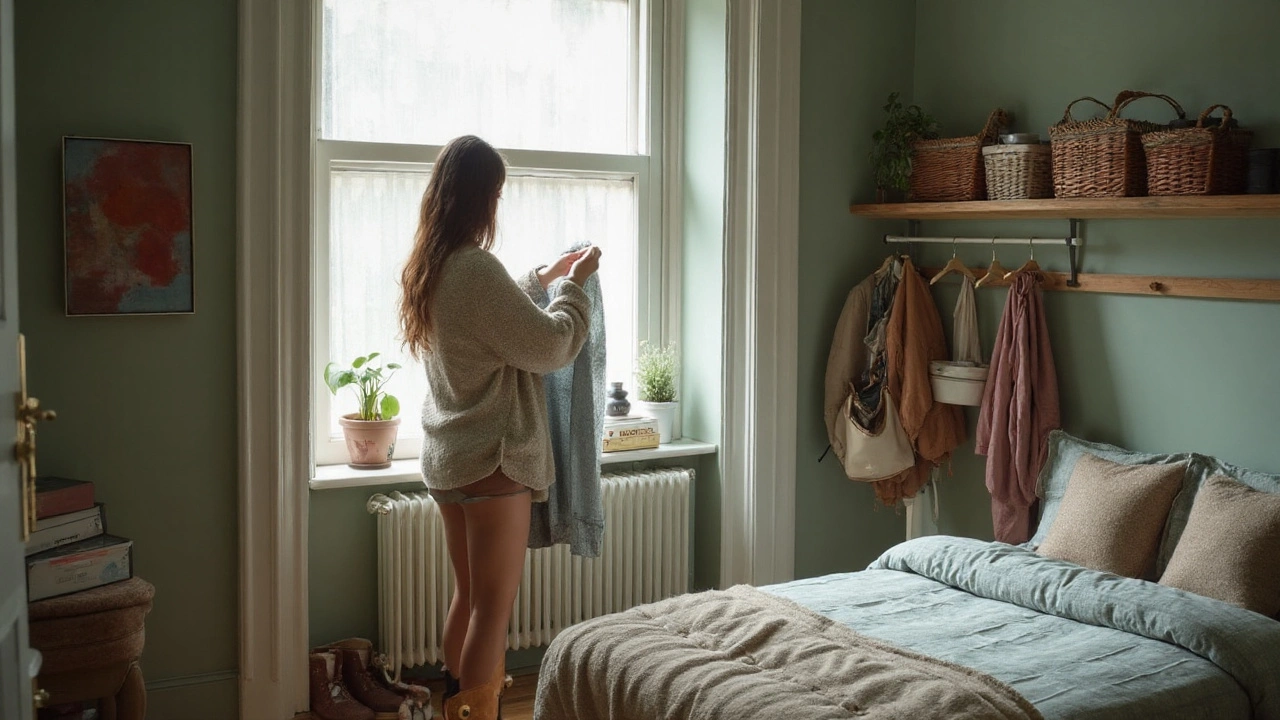
- Bedroom: bed with drawers or lift-up storage, tall wardrobe anchored, wall hooks behind the door, under-bed bins with soft sides.
- Kitchen: pot rail and magnetic strip, back-of-door spice rack, rolling cart that parks under the counter, shelf risers.
- Bathroom: over-toilet cabinet, recessed or surface medicine box, narrow rolling cart, towel hooks instead of bars.
- Laundry/cleaning: pegboard for tools, vertical vacuum dock, wall broom clips, shallow shelves for detergents.
Safety and credibility check: The U.S. Consumer Product Safety Commission reports thousands of annual injuries from furniture tip-overs. Tall cabinets, wardrobes, and bookcases should be anchored with anti-tip kits and mounted into studs. Heavy items go low. Light items go high. If kids or pets are around, doors and bins with latches are your friends.
Budget snapshot (2025 prices vary by region):
- Anti-tip kit: inexpensive. Worth every cent.
- Over-door rack: budget friendly.
- Freestanding wardrobe: mid-range budget.
- Storage bed or lift-up platform: mid to high.
- Custom built-ins: high, consider only after testing needs with temporary pieces.
Quick planning wins: Replace one large, hard-to-fit organizer with two smaller, standard bins. Choose containers that stack perfectly; mix-and-match sizes eat space. Label the short side you see first. Leave one empty bin per room for new items.
Build storage everywhere: walls, doors, ceilings, and furniture (step-by-step)
This is the meat: practical ways to use every surface without feeling cramped. I will separate permanent from renter-friendly, and I will flag common pitfalls so you do not repeat my mistakes (like the time Whiskers knocked an entire scarf pile off a floating shelf that was not into a stud).
1) Walls: your biggest closet
- Track studs and plan a vertical spine. Mark one stud line per wall. Build off that line with a tall cabinet, wardrobe, or ladder shelf. Anchor it. This single move creates a safe, tall storage column without building a closet.
- Add floating shelves, but be strategic. Use 10-12 in deep shelves for books and decor; 6-8 in for spices and small goods; 14-16 in only if you can hit studs and keep loads moderate. Space shelves 12-15 in apart for books, 8-10 in for pantry goods.
- Use rails and pegboards. In kitchens and entries, a rail with S-hooks holds mugs, utensils, bags, and scarves. A pegboard turns one square meter into a flexible command center. Keep heavy pans near studs or mount a French cleat board first.
- Think narrow. Shallow storage feels less bulky. A 5-7 in deep cabinet with doors swallows cleaning supplies and bathroom bottles without crowding the walkway.
Renter-friendly wall moves: tension rods inside alcoves or between cabinets for hanging baskets; removable adhesive hooks for hats and bags; compression poles with shelves (like closet systems) that do not need screws.
2) Doors and little dead zones
- Back-of-door gold. Over-door racks handle shoes, pantry items, toiletries, and cleaning bottles. Pick steel frames with adjustable hooks to clear your door.
- Between-fridge and wall. A 5-6 in wide rolling cart stores oils and wraps. Measure for baseboard height so wheels roll cleanly.
- Under the stairs. Add pull-out bins or a simple curtain rod and floor cabinet combo. Curtains beat doors when space is tight.
- Above doors and windows. One shelf across the top is perfect for books or spare linens. It draws the eye up and makes the room feel taller.
3) Ceilings for light, bulky items
- Ceiling hooks into joists. Hang bikes, foldable chairs, or laundry racks. Use proper ceiling anchors and check joist location with a stud finder. Keep loads light and tall people in mind.
- Garage-like overhead racks indoors? Do this only if you have high ceilings and can hit joists. Great for seldom-used items like holiday bins.
4) Floors and furniture that hide stuff
- Storage bed. Drawers or lift-up platforms turn a whole bed footprint into a closet. Measure under-bed clearance; most bins need 6-8 in. Use soft-sided zip cases for linens so nothing snags.
- Wardrobes and armoires. Look for depth 22-24 in so hangers fit. Use the bottom for shoes in clear boxes. Add a second hanging rod for shorter items and double capacity.
- Storage bench. In the entry, it eats shoes; at the table, it hides linens; by a window, it swallows blankets. Choose soft-close hinges if you have curious pets.
- Coffee table with lift top. Laptops, remotes, craft supplies, done. Add a cable box inside to keep cords tidy.
- Sideboards and credenzas. In living rooms, think of them as horizontal closets. Adjustable shelves inside let you fit towels, board games, or office gear.
5) Clothes storage without a closet
- Open garment rack. Choose a model with shelves below. Put shoes in boxes, seasonal items in two labeled bins at the top. Use matching hangers to keep width consistent.
- Freestanding wardrobe. Anchor it. Add door-mounted hooks for belts and scarves. Use vacuum bags for puffy coats off-season.
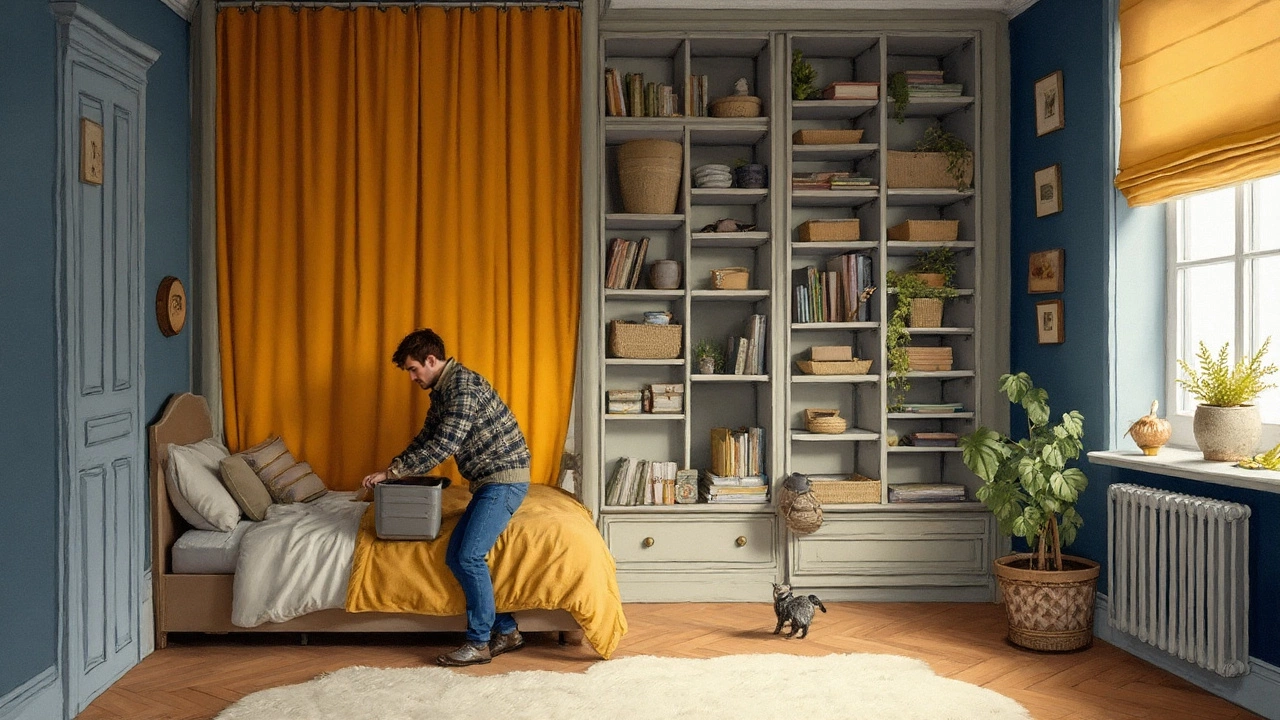
- Drawer towers + curtain. Three stackable drawer units side by side with a ceiling-mounted curtain track make an instant, tidy “closet.” Easy to reverse in rentals.
6) Kitchen storage without uppers
- Rail system. Hooks for mugs and utensils free drawers. Add a narrow shelf above for spices.
- Plate rack + peg drawer. A vertical plate rack saves cabinet space. In drawers, a peg system keeps stacks stable.
- Rolling pantry cart. Park it beside the fridge or in a closet-sized nook you create with a tension rod and curtain.
- Shelf risers and under-shelf baskets. These instantly double cabinet capacity without tools.
7) Bathrooms with zero cabinets
- Over-toilet etagere. Bolt it to the wall. Baskets hide bottles. Keep toilet paper in a lidded bin to block humidity.
- Medicine cabinet or mirror cabinet. Surface-mount if you cannot recess. Store meds out of steam zones per manufacturer labels.
- Hooks over bars. Towels dry faster and you can fit four hooks where one bar goes.
8) Cleaning gear that looks tidy
- Wall clips and a slim shelf. Mount brooms and mops vertically. Put cleaning bottles on a shallow shelf above, out of kid/pet reach.
- Charging station. One outlet shelf for the cordless vacuum and batteries keeps cords off the floor.
Common pitfalls to avoid:
- Mounting heavy shelves into drywall only; use studs or proper toggles and watch the load rating.
- Storing heavy items high; keep weight low to reduce tip-over risk.
- Buying mismatched bins; you lose volume to gaps. Pick one modular line per zone.
- Blocking vents and returns; leave at least a few inches of airflow, especially near heaters.
- Ignoring humidity; store linens in breathable bins, not sealed plastic, in damp rooms.
Renter playbook (no-drill or low-drill):
- Tension poles and shelving between floor and ceiling for closets anywhere.
- Over-door racks for pantry, shoes, cleaning bottles.
- Freestanding wardrobes and bookcases with wide bases; add anti-tip straps to baseboards if allowed.
- Adhesive hooks and rail strips that come off clean. Test on a small spot first.
- Ceiling curtain tracks with adhesive or very small anchors to “create” a closet wall.
Mini decision tree:
- If you need storage today → buy a freestanding wardrobe + over-door rack + under-bed bins. Label and load tonight.
- If you can drill safely → anchor a tall cabinet into studs + add two floating shelves + a wall rail.
- If you cannot drill at all → tension pole system + compression bookcases + fabric drawers + curtains.
- If floors are uneven → choose adjustable feet furniture; shim with rubber pads; avoid glass doors that misalign.
Tools and supplies checklist:
- Stud finder, level, tape measure, pencil, painter’s tape
- Drill/driver, appropriate bits, wall anchors/toggles
- Anti-tip kits, furniture straps, right-length screws
- Command-style hooks/strips, tension rods/poles (for rentals)
- Modular bins (same brand/series per zone), labels, zip pouches for smalls
Keep it tidy without a closet: systems, checklists, and answers
Storage fails when the system is harder than the mess. Let’s make it brainless so you can reset the room in five minutes, even after a long day or a cat zoomie episode.
One-home rule: Every category gets one home. Bags live on the entry rail, period. Extra kitchen tools live on the cart, not the counter. If you move something, relabel so the home follows the habit.
Two-touch rule: Daily items should take two touches or fewer to put away. Hooks beat hangers for coats. Open bins beat lidded bins for kids’ toys. Drawers beat stacked boxes if you access them often.
Label like you mean it: Use short, obvious words. Example: “Batteries,” “Light Bulbs,” “Cables,” “Travel,” “First Aid,” “Winter Hats.” Label the side you see when the bin is in place.
Sunday reset checklist (15 minutes):
- Scan each zone. Anything homeless? Either assign a home or add it to the donate bag.
- Empty your two “clutter bowls” (one by the entry, one in the living room). Sort into correct bins.
- Refold the one messy stack (linens, tees) and stand items vertically file-style so you see them all.
- Move seasonal items up a shelf and bring current-season items down.
- Check labels and replace the smudged ones; clarity keeps the system honest.
Clothes caps that help: One-in, one-out for shoes and coats. Set a hard limit: for example, ten hangers for tops on the open rack, five for bottoms, one bin for lounge. When the space is full, it is time to edit.
Moisture and airflow tips: Store spare towels and bedding in breathable cotton or mesh bins if they live in the bathroom. Add cedar or lavender sachets for fresh scent. Keep at least two inches of space behind furniture placed against exterior walls to reduce condensation risk.
Pet-and-kid proofing basics: If you have a climber (hi, Whiskers), avoid high, open shelves for fragile items. Use doors and latches on lower units. Place breakables in the upper third of anchored cabinets.
Mini-FAQ
- How do I store coats without a closet? Install a wall-mounted rack into studs at the entry and add a storage bench for shoes and hats. Use slim, sturdy hooks so jackets do not crowd.
- What if my walls can’t take anchors? Use tension pole wardrobes, freestanding cabinets with wide bases, and place them in corners for stability. Add non-slip pads under the feet.
- Where do I put cleaning supplies? A shallow wall cabinet with a child lock, or a high shelf with lidded bins. Keep chemicals out of humid bathrooms if labels warn against it.
- How do I keep open storage from looking messy? Pick one container color/material per room, group like with like, and keep fronts lined up. Add a curtain or door to the busiest zone.
- Can I build a tiny closet? Yes: two tall bookcases facing each other with a tension rod between, curtain across the front, and bins on the bottoms. Anchor both bookcases.
Troubleshooting by scenario
- Studio apartment, zero closets: Create a “closet wall” behind the bed with a tension system and curtain. Use a storage bed and a storage ottoman coffee table. Keep the kitchen on a rolling cart that can disappear behind the same curtain.
- Old house with crumbly plaster: Find studs, mount a continuous cleat board into them, then attach shelves/cabinets to the cleat. The load spreads out and protects the wall.
- Low ceilings: Use more shallow, wide storage. Skip tall crown cabinets; choose long, low sideboards and under-bed drawers. Install one high shelf around the room perimeter for seldom-used items to draw the eye up without bulk.
- Narrow hallway: Stay under 8-10 in depth. Peg rail with baskets and a slim shoe cabinet that flips down keeps the path clear.
- Shared space with roommates: Color-code bins and labels by person. Add a shared “returns” bin near the entry for borrowed items and mail.
Simple formula bank
- Needed shelf length (feet) ≈ Total cubic feet you must store ÷ 2.5 (for 12 in deep shelves).
- Under-bed capacity (cubic feet) ≈ Bed width × under-bed height × usable depth ÷ 1728.
- Hanger rail capacity ≈ Usable rail inches ÷ 1.25 (average hanger width for slim hangers).
When to call a pro: If you are mounting very heavy cabinets, cutting into walls, or rerouting electrical, hire a licensed pro. For standard shelves into studs, most DIYers can do it with a level and patience. Always follow manufacturer load ratings and anchor instructions.
Next steps (one weekend plan):
- Friday night: Inventory and measure. Mark studs with tape. Make a shopping list by zone.
- Saturday morning: Buy or order: one tall cabinet/wardrobe, one over-door rack, two packs of matching bins, one anti-tip kit, one set of hooks.
- Saturday afternoon: Assemble and anchor the tall piece. Install over-door rack. Load in seasonal items up high, daily items in the middle, heavy stuff low.
- Sunday morning: Add a storage bench or under-bed bins. Label everything. Set up two clutter bowls and a donate bag.
- Sunday evening: Do a five-minute reset. If something does not have a home, create one or let it go.
You do not need a closet to live neatly. You need a plan that respects how you live, good anchors where it matters, containers that actually fit, and a quick weekly reset. The rest is just picking the right piece for the right corner-and maybe keeping the cat off the scarf shelf this time.