Mirror Quality Checker
How to Check Your Mirror
This tool guides you through the key tests to determine mirror quality using simple household items. Follow the steps and get your assessment.
Quick Check Takes less than 5 minutes to complete.
Flatness Test
Color & Reflection Test
Light Reflection Test
Quality Assessment
Quick Takeaways
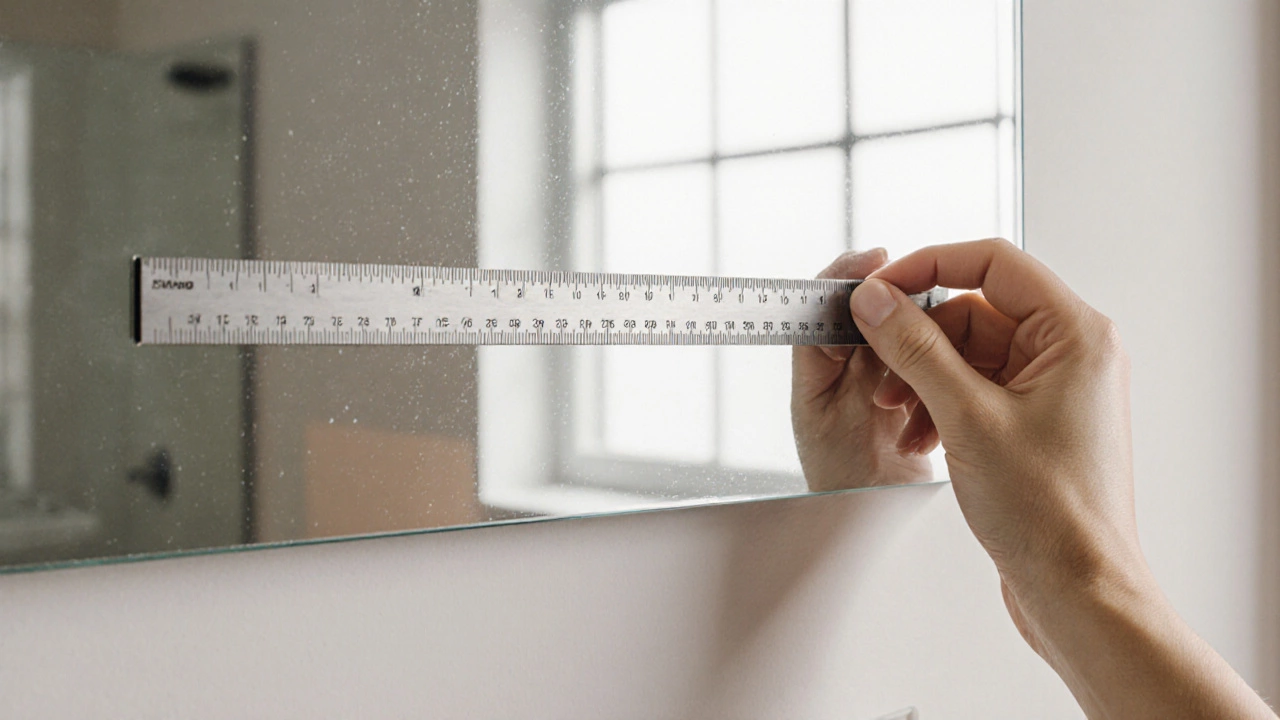
- Check flatness with a straight edge or a ruler - any wobble means distortion.
- Look for a clear, bright reflection; dullness or color tints signal poor backing.
- Glass mirrors feel heavier and cooler than acrylic; weight is a good proxy for quality.
- Inspect edges - polished or beveled edges indicate proper finishing.
- Use a quick light test: a single light source should produce a single, crisp reflection.
What Makes a Mirror “Good Quality”?
When you stand in front of a mirror, you expect an exact copy of yourself - no warps, no color shifts, just a true‑to‑life image. A Mirror is a reflective surface, typically glass coated with a thin metallic layer, that redirects light back toward the viewer. Quality boils down to three core factors: flatness, clarity, and durability. If any of those slip, the mirror will look cheap, and over time it may even crack or peel.
How Mirrors Are Built
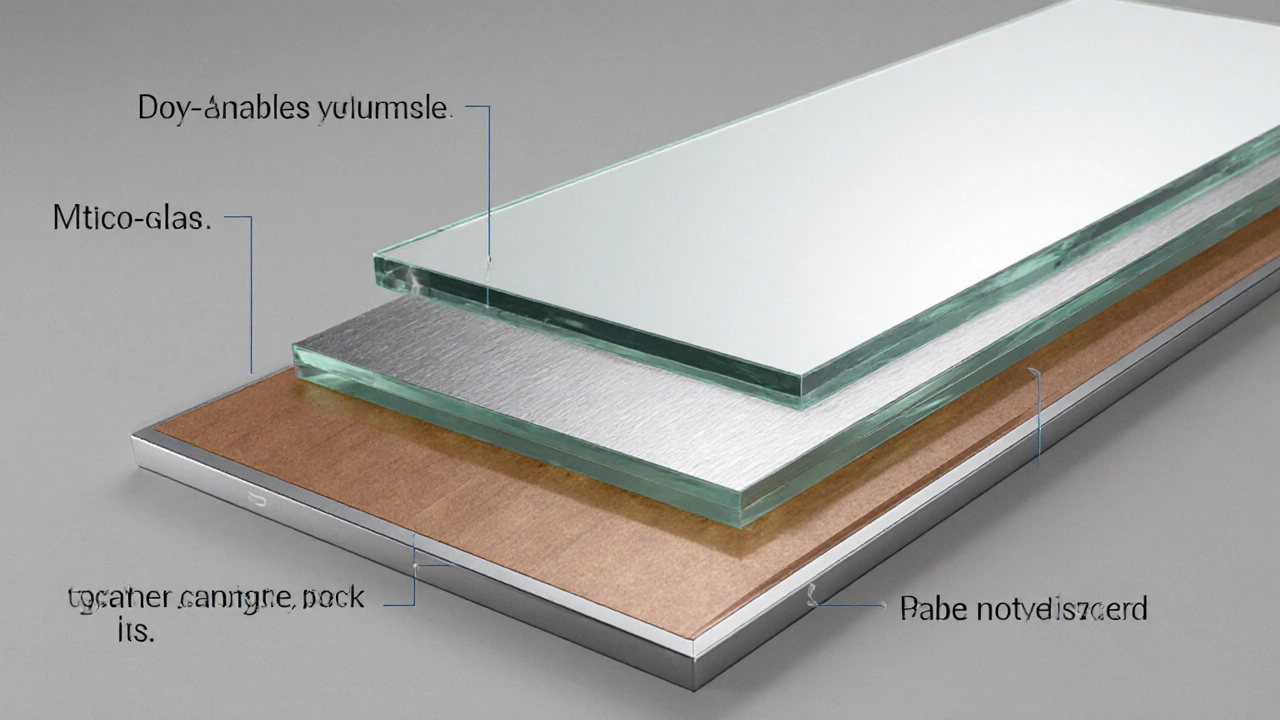
Understanding the construction helps you spot shortcuts. Most high‑end mirrors follow this chain:
- Glass Substrate - Float glass, usually 3 mm to 6 mm thick, provides a rigid base.
- Silvering - A thin coat of metallic silver (or aluminum for budget models) is vacuum‑deposited on the back. This is the actual reflective layer.
- Protective Backing - Paint, copper, or a polymer layer shields the silver from oxidation.
- Edge Finishing - Polished, beveled, or sealed edges protect against chipping.
- Frame (Optional) - Wood, metal, or plastic frames add style but don’t affect optical performance.
If any step is rushed, the image will suffer. For example, acrylic mirrors replace glass with a lightweight plastic; they’re fine for temporary setups but tend to warp under temperature changes.
Visual Tests You Can Do at Home
Before you buy, or even after it’s installed, grab a ruler, a straight edge, or a cheap picture frame and run these checks:
- Flatness Test - Place the ruler across the surface. If you see gaps or the ruler rocks, the mirror is not perfectly flat. Even a slight curve will stretch or compress the reflected image.
- Distortion Test - Look at a straight line (like a hanging towel rack) reflected in the mirror. Any bowing, double lines, or “wavy” effect means the glass or backing is uneven.
- Color Check - Stand under a neutral white light and observe your skin tone. A good mirror will show true colors; a yellow or green tint indicates poor backing or cheap acrylic.
These tests take under a minute and require nothing more than what you already have at home.
Physical Checks - Feel and Weight
- Weight - Glass mirrors feel solid and cool to the touch. If a large mirror feels surprisingly light, it’s likely acrylic or a glass‑core with a hollow backing.
- Edge Quality - Run your fingertip along the edges. Polished or beveled edges are smooth; rough, sharp edges suggest cheap manufacturing.
- Surface Temperature - After a few minutes in a warm room, a glass mirror stays cool, while acrylic warms quickly and may feel slightly tacky.
Light Reflection Test
Grab a flashlight or use a lamp with a single filament. Shine the light onto the mirror at a 45‑degree angle. Observe the reflected spot:
- If you see a single, sharp point of light, the reflective coating is even.
- If the spot splits into multiple blobs or looks fuzzy, the silvering layer is uneven - a sign of lower quality.
This test works even in a dim bathroom, making it handy for on‑site checks.
Frames, Edges, and Finishes
A beautiful frame can mask a bad mirror, but it also adds cost. Look for these signs:
- Secure Mounting - The mirror should sit flush against the frame without gaps.
- Material Match - Hardwood or powder‑coated metal frames usually indicate a higher‑end product, while cheap plastic frames often accompany low‑grade acrylic mirrors.
- Sealant - Silicone or a neat bead of glue around the edge prevents moisture from seeping into the backing.

Glass vs. Acrylic Mirrors - Quick Comparison
| Attribute | Glass Mirror | Acrylic Mirror |
|---|---|---|
| Weight (per sq ft) | ~6 lb | ~2 lb |
| Flatness | Excellent - < 0.1 mm warp | Variable - can warp with heat |
| Clarity | Crystal clear, no tint | May show slight haze or yellowing |
| Durability | Resistant to scratches, can break | Impact‑resistant, scratches easier |
| Cost | Higher - £30 - £120 per ft² | Lower - £15 - £60 per ft² |
For most permanent home‑decor projects, glass wins on flatness and clarity. Acrylic shines in temporary setups, rental properties, or kids’ rooms where safety is a priority.
Common Pitfalls to Avoid
Even seasoned shoppers slip into traps. Keep an eye out for these red flags:
- “One‑Way” Mirrors Sold as Regular - These have a tinted coating on one side; they appear dark unless strong back‑lighting is present.
- Cheap Polished Acrylic - It looks shiny but bends light, creating a warped image.
- Untreated Edge‑Glass - If the edges are raw glass, the mirror is more likely to chip during handling.
- Oversized “Mirror Tiles” - Small tiles glued together often have visible seams that distort reflections.
Buying Checklist - Your Quick Reference
- ✔️ Verify the mirror is glass (ask for “float glass” if unsure).
- ✔️ Run the flatness test with a ruler or straight edge.
- ✔️ Check the reflection under white light for color accuracy.
- ✔️ Feel the weight - a solid, cool feel means quality glass.
- ✔️ Inspect edges - they should be beveled or polished, not sharp.
- ✔️ Look for a protective backing coat (paint or polymer).
- ✔️ If framed, ensure the frame is sturdy and the mirror sits flush.
- ✔️ Request a light‑reflection demo if buying in‑store.
Having this checklist in hand will make you confident, whether you’re shopping online or strolling through a showroom.
Frequently Asked Questions
Can I use a smartphone screen to test mirror flatness?
Yes. Open a white image on your phone, hold it flat against the mirror, and look for any gaps or double lines. If the image stays uniform, the mirror is likely flat.
Why does my mirror look greener in low light?
A faint green tint often means the silvering layer is thin or starting to oxidize. High‑quality mirrors use a protective copper backing that blocks this hue.
Are anti‑fog coatings worth the extra cost?
For bathrooms that get steamy, an anti‑fog coating prevents mist from clouding the surface, keeping the reflection clear. The trade‑off is a slightly higher price and a need to clean with non‑abrasive products.
Is a heavier mirror always better?
Heavier usually means thicker glass, which gives better flatness and durability. However, if a heavy mirror isn’t properly mounted, it can stress the wall. Pair weight with solid fixing hardware.
How do I spot a fake "mirror" that’s actually polished metal?
Polished metal reflects light but creates a subtle distortion around edges and often shows a faint rainbow fringe. A true glass mirror will give a clean, distortion‑free image.